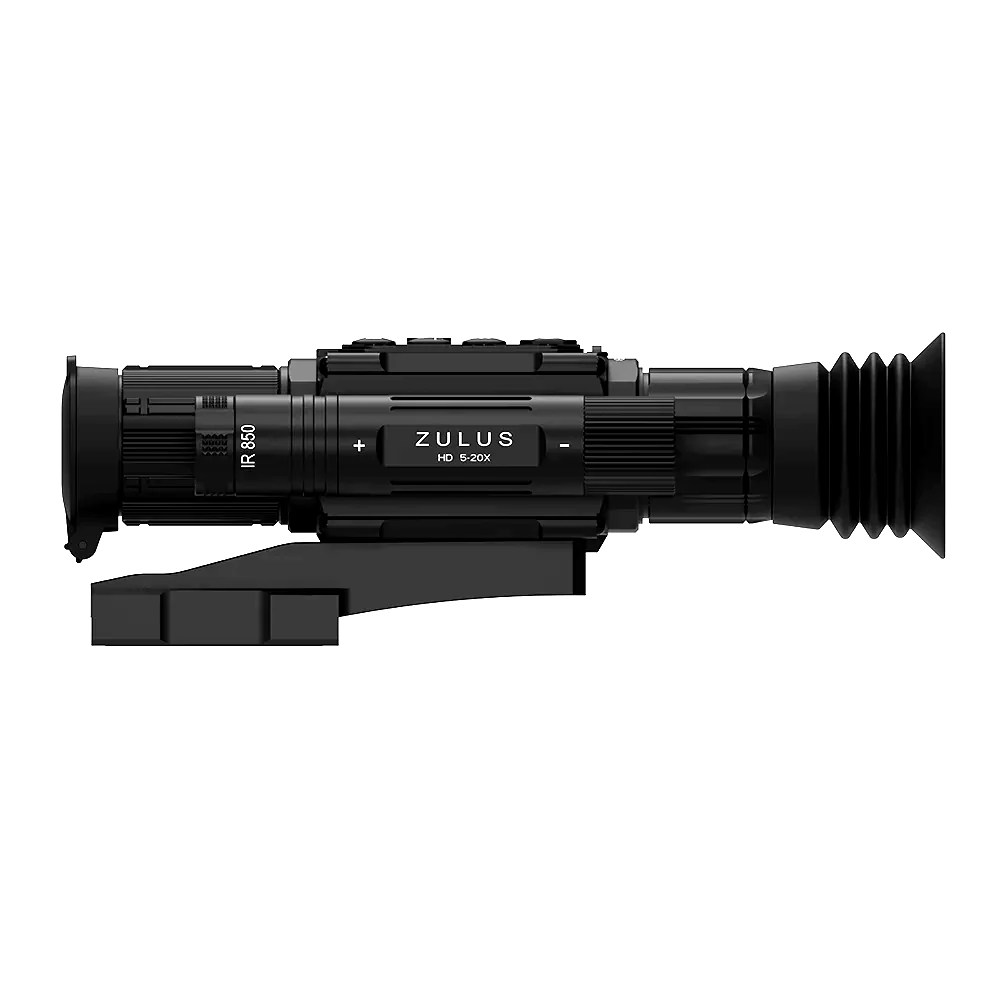
Arken Optics ZULUS 5-20 LRF

Arken Optics 5-20x LRF Review
Pros
- Lightweight and image quality is superb even in the toughest light, built in IR is phenomenal.
Cons
- Turning on the scope takes a little longer and RAV (recoil activated video) function doesn't work.
Summary
Arken Optics ZULUS HD 5-20 LRF Review
It has been a while since I did a written scope review so when Arken optics got in touch to have a look at their range of Night Vision products I jumped at the chance.
As many of you know I have tested and used a vast array of Night vision and thermal optics over the last ten years as well as daytime time optics so when giving the opportunity to play with new tech I really cannot say no, guess that’s the shooting geek on me coming out.
Arken Optics is relatively new on the scene and although I have come across their products I have not had a chance to actually meet anyone or see any of the products they have had until now. I have to admit the excitement I showed when I got back from Tennessee to find this sitting in my front room table just screaming at me to be mounted onto one of my sexy rifles was uncontainable, I know simple minds and all that but it truly has been too long since I got to play with new stuff.
Right before I get into the review I need to get all the geeky stuff out the way, and there is a lot so bare with me.
Current price is £599 For LRF version
Specs.
Sensor Spec:

Resolution and Video Record: 1920-1080 pixels
Sensor Frame Rate : 60hz
Optical Spec:
Digital Mag : 5x – 20x
Eye Relief : 45mm
Detection Range : 400m
Diopter adj : +/-5D
Display:
Type: Micro- OLED
Display Res: 1920-1080 pixels
Frame rate: 60Hz
Battery:
Operting time: 8hrs
Battery type: 18650 flat top (not supplied)
External power : 5v C-Type USB
Weight: 483g net – with mount 584g
Micro TF Card – 32 -128gb (not supplied)
Waterproofing – IP67
WiFi – App Support and Arken Ballistics
IR – Optional 850nm and 940nm
IR Power – 5w
Bluetooth- Support via ballistics app Arken
LRF – 1000m range function
Full support and specification and user manual by clicking HERE
Out of the Box
I was way too excited over the unboxing of this product as you will see on the video that I barely was off the plane and started to get some sort of studio set up to get this unit unboxed and mounted and trust me it was not an easy three day journey to get back from Tennessee this time, with planes breaking down and weather hampering as well as the long 3 hour drive home from the airport I genuinely am surprised we made it home let alone have the energy to start a review, but it was a pleasure to return to almost as good as seeing the kids haha!
The packaging of the ZULUS is professional and good quality, on opening the cellophane wrap the box feels sturdy and well packaged with the common magnetic closed lid that you are used to when opening a good quality scope these days from some of the bigger manufacturers.
Inside the box you are revealed to a tightly packed ZULUS unit, Instructions, Cleaning cloth, USB cable and rubber eye cup, I was also provided a zero MOA mount in a separate box to attach the ZULUS for mounting.
First impressions of the ZULUS was its size, it is far more compact than most scopes on the market and considerably lighter, measuring at a mere 8 inches in length with the eyecup attached is almost half the size of its competitors.
The feel of the ZULUS in the hand was indeed good quality and the ergonomics of the unit itself with its compact nature was very surprising. Easy to reach buttons and quality feel made me eager to get the scope on my rifle so I can mess around with it.
Mounting to the rail mount was easy with the screws provided and with the torque measurements marked clearly on the mount for attaching to the scope as well as to your picatinny rail made life a lot simpler than having to research or worse guess the right torque settings.
Once mounted I turned the scope on for the first time and mad it felt light on the rifle, but not unbalanced like I thought it would feel. On first look through the scope out the window of the house it looked crystal clear on day mode with no issues at all with the image, I was immediately impressed.
Going through the buttons I familiarised myself with what they all did, firstly with my eye off the scope looking at the buttons then with my eye looking through the scope to see what each button did and working on a muscle memory so I can use the unit in the night. The options in the menu screen was self-explanatory and easy to work out with nothing complicated, especially if your already used to using NV products but even if you are a complete novice to nightvision it is not hard to understand. With only the need to use 2 navigational buttons and the top button to select your prompts it was not hard to get set up on what you needed to know very quickly.
Bore sighting the scope was very easy, I originally set my distance to 25yrds looking down the bore of the rifle to a fixed location, on this occasion a blue sticker less than 20yrds away in the garden, then using the calibration prompt from the menu I quickly freeze framed the image and matched the scope with the bore. I am going to say as I will mention later this scope is the easiest by far out of ANY scope I have used to set up and zero, but we will talk about that later.
The Tests.
The ZULUS boasts the new Sony cmos sensor, along with ED Glass and cutting edge technology to full intensify the image and I have to say it does.
First test was zeroing,
As said before I bore sighted, like I would do with any scope, at around 25yrds so I knew I would be on paper at 100m but the question is with these things how easy is it to actually zero?
There is two ways to zero this scope, one is to use the app which you can download onto your phone or tablet, I would use a tablet as sometimes your phone is just a little hard to see, and the other way is to do it on the scope itself.
I set up a box with targets on it so I had a large area to guarantee that I knew where my impacts would be.
To do it on the app – open up the app, first download this through your app store, and link it via Wi-Fi to your phone by holding down the right hand, brightness, button to activate the Wi-Fi then pair it to your phone. Take your shot, mark where the impact using tape or a black dot or something that is visible, open up calibration from the menu on the app, freeze frame the target with your crosshairs pointed to where you were aiming, tap the power button, just a tap, this will freeze frame the target and then using the app you can either drag and drop your crosshair to the impact spot or fine adjust using the X and Y markers on the phone, click save and take another shot.
To do it on the Scope- Almost the exact same process but instead you use the left and right buttons to choose your X and Y and your up and top and menu button to change the value and to save you hold down the left (IR&DAY/NIGHT mode) button.
I have to say though it sounds an awful lot more complicated than it really is in fact it is so simple that I have to say it is the easiest scope, day or night or thermal, that I have ever had to zero and I have done lots, in fact I still get people calling me up regularly asking advice on how to zero their scopes.
The ZULUS zeroed very easy and it has true 2 shot zero, the clarity of the scope being able to see your impacts due the Sony sensors make this whole process simple.
I was eager to get to grips with this scope at the range before even thinking about going out on a fox or a deer, I needed to know where everything was and how to work it and range time is truly the only way you can practice.
I set about working through the menu getting to know what I can use and cannot use.
The Ballistic Calculator was the next test, you have two functions of this you have hold over, where the scope will put a mark on reticle where you need to aim and you have dial in function where the scope will automatically adjust the reticle to your aim point after you range your target. Both the functions work using the laser range finder and have to be set up on the ballistic app. To get true calculations to use both these functions you need to put your data for your rifle, calibre, bullet speed and bullet ballistic co-efficiencies into the ballistic app and transfer to the scope via Bluetooth, once you have all this data through to your scope then you choose if you want true time ballistics ( this is when your scope is constantly connected to your phone via the app and it reads the table on your phone) or Table Ballistics (where you download the table data to the scope and use it not connected to your phone), I would suggest using table ballistics.
Now there are two apps you need, the Arken optics app itself and to coincide and transfer data via Bluetooth you need the Arken Optics Ballistic app. To be able use the bullet drop and dial in function or the ballistics you will need to know your DOPE, you will need to know the actual muzzle velocity of your rifle with that bullet, the ballistic co-efficiencies of the bullet, the height of the scope on your rifle etc.etc, the scope cannot determine this for you and to use it efficiently you have to be accurate and no guess work, you cannot go with what is on the box of rounds because your rifle could be shooting faster or slower than what the ammo box says and that would make all of this really ineffective and in accurate.
My suggestion is if you do not know your data don’t try using this function.
The Laser rangefinder- To use this there is a button behind the laser rangefinder that turns it on and off, the rangefinder can give you both a single range or can stay on and range as you scan and track, bare in mind if you are scanning and tracking you must keep the rangefinder pointing at your target NOT YOUR CROSSHAIR. During the day the range finder will have its own crosshair, I always suggest to aim this at the bottom of your target for the most accurate range thus not making the mistake of ranging over or around your target which could change your range significantly, at night your rangefinder shows up in your scope as a bright light illuminating your target, invisible to the naked eye but you can see this easily in the scope even with the IR on full again same principle arises. If your using the Ballistics then the rangefinder will activate your chosen reticle adaptation of the telling you where to shoot.
The button layout is easy on the scope, most have a dual function so be aware of that.
Power Button, this is also the freeze frame button when zeroing or “calibrating the reticle” as the scope calls it. To Freeze frame just a small tap during calibration, a slightly longer hold will make the scope go on standby and a full countdown will turn the scope off.
The Settings Button has three functions, a Long hold will open the menu, it is also the down button for changing values on the Y axis when zeroing, and a quick tap during normal mode will change the colour of the reticles during use.
The left butting also is multi functional, A long press changes your mode from Day to Night or Night to Day depending what you are already on, if your in night mode this will also work the IR it will turn it on and change the intensity, while going through your menu function this is your left button to move through the icons, it also is your left button when in calibration mode for zer to move back to X if your at the Y section and also during zeroing a long press hold will save your zero settings.
The right button is the opposite buttom as you may have thought when using menus, it is also your contrast/ screen brightness button and during normal function if you give it a long press it will turn your Wi-Fi on and off displaying its SSID.
Top button is your camera button for toggling video and picture mode turning camera on and off and when in the settings this is you select button for selecting your icon and during zeroing in your calibration this is the button you use to increase the Y value.
Zoom is very handy place above the dioptre focus there is a scroll wheel for easy magnification change, it starts off at 5x then 7.5x then 10x, 12.5x 15x 17.5x and finally 20x.
To focus to see the screen there is the usual dioptre focus on the rear of the scope and to focus the target picture you have your front focus. Bare in mind you will find you will have to refocus the scope between day and night mode.
Getting used to where the buttons are and what they do will always be fiddly at first but it is important to realise that most of what your planning to do will be in the dark with this scope so it is important that you get to know them.
First Hunt
Now I had got to grips with the Arken ZULUS it was time to take it out into the field at night on a fox, this was the first time I got a chance to see what the unit was like at night which I was intrigued about and the reason for the most part of why I love reviewing nightvision products because I love working at night when everyone else is in their bed sleeping.
I walked quietly into the fields to where I was going to spend the evening, leaving the rifle and my gear at my “stand” I walked out into the darkness to lay down my Foxpro caller 100m away from where I had planned to sit up. The wind was almost non existent there seems to be no breeze whatsoever but it was cold at around -1 degrees C, on returning to my sit up point or “stand” I lay down behind the rifle and turned the ZULUS on, it was a pitch black night where the cloud cover took away all the ambient light from the sky, through the ZULUS I was amazed, with the built in IR at level 1 I could see the fields in front perfectly, and not just the usual 100 to 150yrds you get from most built in IR units but crystal clear, even when I increased the IR there was no glare back or wash out it remained very clear. I started ranging out points in the field, 150yrds easily seen, 200yrds easily seen and 252yrds easily seen even as far as 321yrds absolutely still clear on the lowest IR setting even better when turning the IR up.
I put on the caller and started playing Vixen mating call, after the first couple of blasts a signature appeared on on my thermal, I then moved to the ZULUS for a better look and there was a badger clear as day wandering towards the caller then wandering off again.
Once the badger had disappeared out of sight I started the caller up and then almost immediately a fox appeared from the same direction, it ran to around 70m away from me and started barking loudly at me, I took aim through the ZULUS squeezed the rigger and the fox was down. Immense result as I had a phone call from the farmer saying that something was bothering his sheep and night and he was losing chickens. It was a big dog fox, very heavy and definitely the potential to be a lamb killer this year not to mention the main culprit for the chickens.
I was delighted the result was perfect, one shot clean through a crystal clear image, I already had my confidence boosted by this and the ZULUS really did start to make me think this could actually be one of the clearest and most accurate scopes on the market right now special at this price range.
My next chance was to get out on a Roe, I knew there was Roe Buck browsing one of the plantations on the estate that I work so I made a plan to use again the .223 to hunt with using 55gr Vmax bullets.
The Stalk wasn’t long I only needed to walk around 300yrds into the plantation before I seen the culprit , A young Roe Buck feeding heavily with Doe in some thick immature Sitka, it was difficult to see with the naked eye but through the ZULUS it was real clear even with all the vegetation around about him during the day it is very clear. Now I have used DAY/NIGHT vision scopes of various brands both day and night and many struggle with daytime shooting even if they are in colour, The ZULUS did not, I could not believe how defined the Buck was and how easy the shot was to take seeing everything I needed to see around about him. With no hassle I was able to make the shot successfully.
My Thoughts and Final Review
After using the Arken Optics ZULUS for the last couple of weeks I have grown very fond of it. It has done almost everything I have asked of it with some very good points that make it far superior to its competitors. I will run through my bad and good points.
Good Pints:
- The ZULUS is very user friendly and easy to use, from the mounting stage straight through to zeroing there is no real complications or hurdles to overcome. I found the menus clear and nothing in the way of the set up did I get confused about, yes I know I have a lot of experience around these type of scopes but I think even a novice shooter would be able to easily get to grips with it as long as the fundamentals are right.
- Laser range finder is accurate and easy to use. It works well with the ballistic side of things but you do need to know your data to set it up properly, knowing this is not a scope problem it is a YOU problem if you know what I mean.
- Picture quality day and night is almost perfect, it is crystal clear and is clearly better than the PARD or the HIKMICRO Alpex , The ZULUS is really punching harder than these at this price.
- The Price is phenomenal, don’t get me wrong it is right where it needs to be to be competitive but I know most would not complain if the had to pay more for this product.
- Ergonomically the ZULUS is amazing , being a left shoulder shooter right hand action I often struggle navigating the other scopes on the market, The ZULUS has a true one hand ambidextrous friendly design that its competitors truly struggle with.
- Size, in this case size being smaller than the rest making it better than the rest, it helps with weight and ergonomics there is no hassle with this being bulky or making your rifle heavy and even though it small it does not make your rifle unbalanced.
- The ZULUS takes a 18650 battery which is removeable and can be charged in or out of the unit which is a bonus.
- It takes a micro SD card so there is no need for having to struggle to get your footage off the device.
- No need for a separate IR, the built in IR is sufficient enough for to get the job done and no glare or wash out image.
Bad Points:
- There is a button to activate RAV ( recoil Activated Video ) but it does not work at the moment, I believe they are planning to make this additional in the next firmware update which is disappointing but not the end of the world.
- Battery life is 8 hours IF you do not have everything working at the same time, if you have IR on full, Bluetooth working, Wifi on and recording you are going to lose battery power very quickly, thankfully us night shooters always have spares lying about as many of us who work at night nearly all our products take 18650 batteries.
- Although the laser rangefinder is good you may have to have to use it on the lower magnifications dependent on where your zero is sitting, just bare this in mind if your zoomed into 20x and you cannot see your LRF just zoom back and you will see it day or night.
- Turning on is not the fastest out there, one of the failings of the ZULUS is powering on in a hurry, its does take a 2 second press and it is easily overcome when it is on standby BUT if your rushing to get the scope on for the fleeting fox that you caught onto as you entered the field then be a little more calm and patient, other scopes on the market have sussed this out better.
- WIFI on and off, often I have found me turning the wifi on when I did not mean to, when it is on wifi you cannot access any of the settings on the scope you have to use the app, this is a pain if your trying to do stuff quick and you do not realise you have turned the wifi on , easily fixed by turning the wifi off again but it is a niggly issue.
- If your using this indoors for airgunning, do not get the 5-20x mag version as the field of view is really too small for those close up shooting that airgunners require for indoor work.
I am nit picking bad points now, for £599 you are getting a lot for the money and the quality is there too. I truly will be sad to see this little scope it has been fantastic playing with it and I will endeavour to get one for myself. Fantastic scope fantastic price and man what an image it gives. Such a pleasure to use.
A clear 8 or 9 out of 10 from me.


